

A little background for those new to using Power BI and Data Gateways. If the data source for your Power BI dataset lives on-prem or behind a private endpoint, you will need a Data Gateway to access the data. If you want to keep your data fresh (either using Direct Query or Import mode), but don’t want to rely on a specific user’s credentials (because we all want to go on vacation at some point), you will need to use a service principal for authentication.
The title of this post is something I have to do on a not so regular basis, so I always have to look it up because I inevitably forget a step. I decided to create a post about it, so I don’t have to look through pages of handwritten notes (yes, I still take handwritten notes!) or use my search engine of choice to jog my memory.
- Add Service Principal as a user of the data source(s) in Data Gateway – this can be done in the Power BI service
- Add Service Principal as an Administrator of the Data Gateway – this can be done in the Power BI service
- Make Service Principal the owner of the dataset – this must be done via PowerShell
- Bind the dataset to the Data Gateway data source(s) – this must be done via PowerShell
These are the high-level steps. If this is enough to get you started, you can stop reading now, but if you need more details for any step, keep reading.
Here are some prerequisites that I do not cover in this post. But I do provide some helpful links to get you started if needed.
- Power BI Premium workspace (currently Service Principals only work with Power BI Premium or Embedded SKUs)
- Have a Service Principal created and added to an Entra ID (f.k.a., Azure Active Directoy) Security Group
- Azure Key Vault – because we DON’T want to hard code sensitive values in our PowerShell scripts
- Have a Data Gateway installed and configured in your Power BI tenant
- The Power BI Tenant Setting, Allow service principals to user Power BI APIs, must be enabled and the security group mentioned above must be specified in the list of specific security groups
- The Power BI Tenant Setting, Allow service principals to use read-only admin APIs, must be enabled and the security group mentioned above must be specified in the list of specific security groups
- The data source(s) used for the dataset must already be added to the data gateway
- The following PowerShell Modules installed: MicrosoftPowerBIMgmt, Az. If you need help getting started with PowerShell, Martin Schoombee has a great post to get you started.
This might seem like a LOT of prerequisites, and it is, but this scenario is typical in large enterprise environments. Now, on to the details for each step.
In my environment I have a service principal called Power-BI-Service-Principal-Demo that has been added to the security group called Power BI Apps. The Power BI Apps security group has been added to the tenant settings specified above.
Step 1 – Add Service Principal as a user of data source(s) in Data Gateway
This step requires no PowerShell! You can do this easily via the Power BI Service. Start by opening the Manage connections and gateways link from the Settings in the Power BI service.

You will be presented with the Data (preview) window. Click on the ellipses for your data source and select Manage Users from the menu.

Search for your security group name (Power BI Apps for me) in the search box, then add it with the User permission on the right side. Click the Share button at the bottom to save your changes.
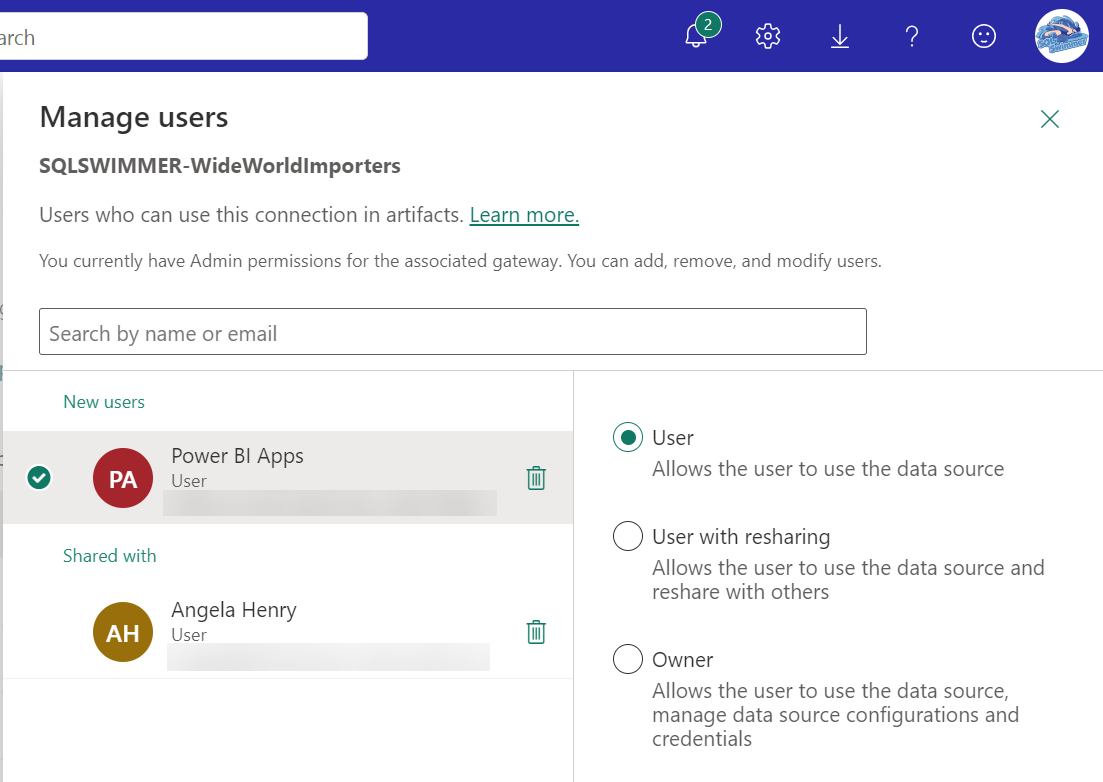
That’s it for step 1, super easy!
Step 2 – Add Service Principal as Administrator of Data Gateway
This step requires no PowerShell! This wasn’t always true, but it is now! You can do this easily via the Power BI Service. Start by opening the Manage connections and gateways link from the Settings in the Power BI service just like you did in Step 1.
You will be presented with the Data (preview) window. Click on the On-Premises data gateways tab. Click on the ellipses for your gateway and select Manage Users from the menu.

Search for your security group name in the search box, then add it with the Admin permission on the right side. Click the Share button at the bottom to save your changes.
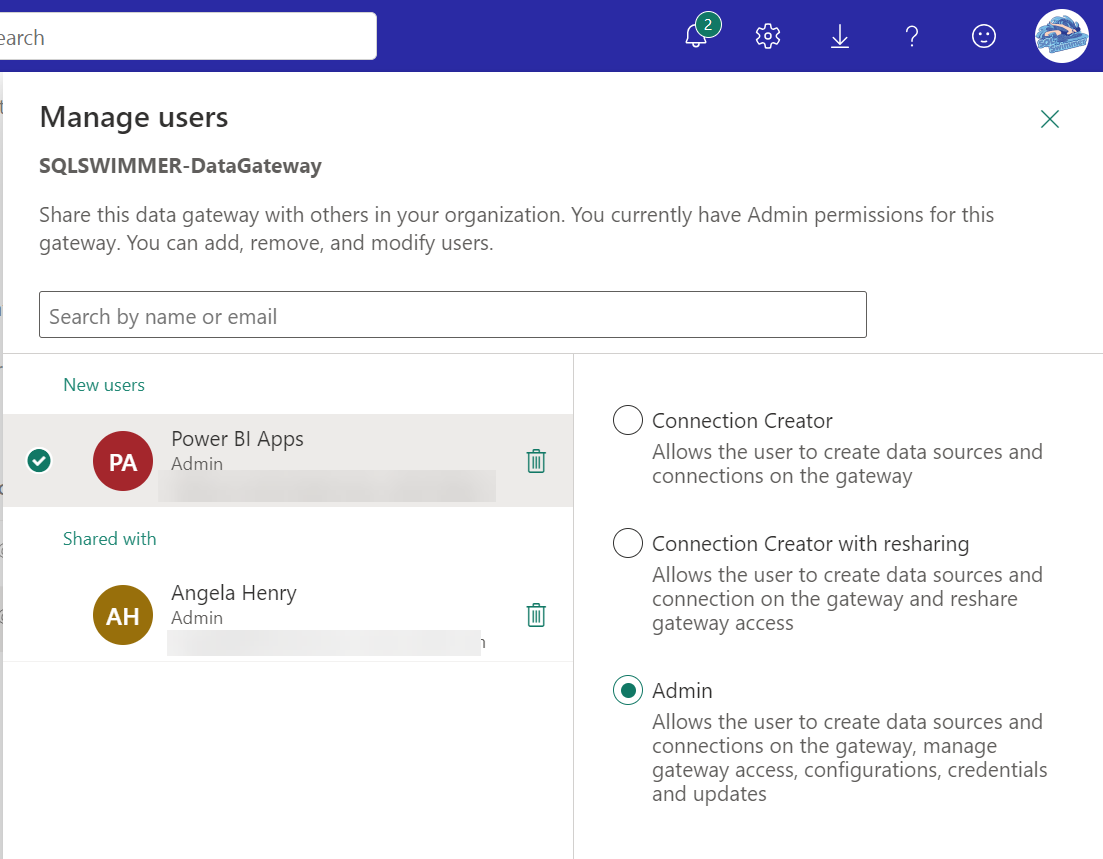
That’s it for Step 2.
Step 3 – Make Service Principal the owner of the dataset
In order for your dataset to be independent of a specific user’s credentials, we need to have the Service Principal take over ownership of the dataset. Normally taking over as owner of a dataset is a simple thing to do in the Power BI service, however it’s not so simple for the Service Principal. The reason for this is because in order to use the Take over button in the dataset settings, you must be logged in to the Power BI service and Service Principals cannot log into the Power BI service interactively, that’s the whole point. So, we must use PowerShell to make this happen. I have created a PowerShell script to do this and I do in combination with Step 4, below.
Step 4 – Bind the dataset to the Data Gateway data source(s)
There is no interface in the Power BI service that allows users to bind datasets that are owned by Service Principals to Data Gateway data sources. So, you guessed it (or you read short list of steps above), you have to use PowerShell to do it. I have combined Steps 3 and 4 into a single PowerShell script, which you can download from my GitHub repo. My PowerShell scripts assume that you have secrets in your Key Vault for the following values.
- Service Principal App ID
- Service Principal Secret Value
- Service Principal Object ID
- Power BI Gateway Cluster ID
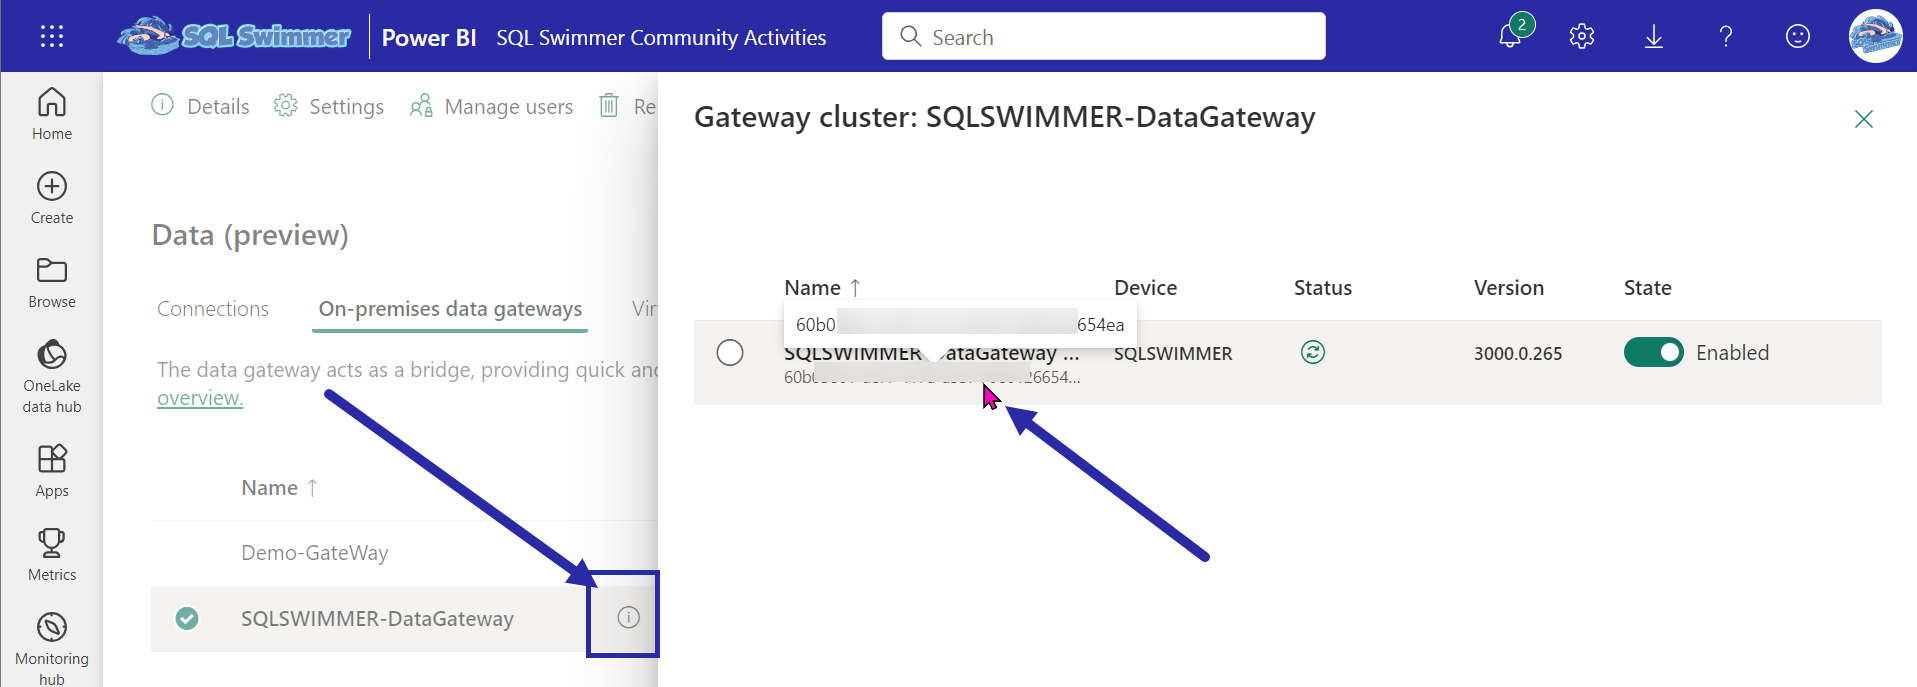
If you don’t have the secrets, you can always hard code your values in the scripts, though I wouldn’t recommend it. Those are sensitive values, which is why we store them in Key Vault. If you are unsure about how to get any of these values, this post should help you out for the Service Principal values and you can get your Power BI Gateway Cluster ID from the Data (preview) screen accessed by Manage connections and gateways menu option. It’s not super obvious, but you can click the little “i” in a circle for your gateway to get your Cluster ID.
In addition to these key vault values, you will also need
- DatasetID
- WorkspaceID
- Name of your Key Vault
- Your Azure tenant ID
- Your subscription ID where your Key Vault resides
You will also need the data source ID(s) from the Data Gateway. Lucky for you I created a script that will get a list of those for you. You’re welcome. The GetGatewayDatasources.ps1 script will return a json payload, the ID of your data source is in the id node. Be sure to pick the correct entry based on the name node.
You are now ready to use the PowerShell script, TakeOverDatasetAndAssignSPtoGatewayDataSource.ps1, to finish off Steps 3 and 4. Here is a screenshot of the PowerShell code, you can download a copy of the code from my GitHub Repo. You need to provide the parameters based on the list above, modify values you use for your secret names in Key Vault, and provide your Gateway data source ID(s) and you are all set.

I couldn’t have done this without the help of these resources. I have essentially combined them in this post to make it easier for me to remember what I need to do.
- GuyInaCube video, Refresh your data in Power BI WITHOUT a user
- Taking it to the next level for CI/CD pipeline with this post by Tackytechtom
I hope this was helpful.